— updated after BootCamp 5 release June 2013 —
Where can you get a direct download of Windows drivers for Macs if BootCamp is stuck, and says 'could not continue' or you have some other problem downloading the drivers?
The brute force solution: it’s a darned large download, so physically take your machine to somewhere with a very fast internet connection that can download 600MB – 1GB in a couple of minutes. There, you’re done. Especially if you have a laptop, this would be the simplest solution - even take it to an Apple Store.
For the rest of us:
- If you have 64 bit Windows 8, and your Mac is 2010 or later (2009 or later for Mac Pro) then see if this page works for you: www.cafe-encounter.net/p1414/direct-download-of-bootcamp-drivers-for-windows-8
- If not, then first find out your Mac's ModelIdentifier
- Q: How do I find my Mac's Model Identifier?
A: Open System Information, and look in the Hardware Overview section.
In other words: Click Apple menu -> About this Mac -> More Info… -> System Report -> Hardware. Now, read down the list in the Hardware Overview panel, looking for Model Identifier
- If you're stuck, see the note below.
- Note that a ModelIdentifierHasNoSpacesInItAtAll.
- Q: How do I find my Mac's Model Identifier?
- Second, get a download manager. You can try doing without, but the reason you're on this page is that you're having trouble getting a file to download reliably. A download manager such as iGetter or Folx solves this problem.
-
Then, search for your ModelIdentifier in the table below. Click the link to get the download package. Be patient as they are 600MB to over 1GB. It will be much simpler if you do the download in OS X, because OS X can open the downloaded file and also open the dmg file inside it.

-
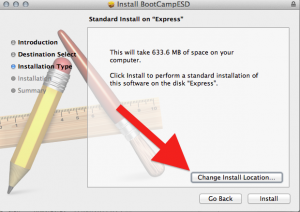
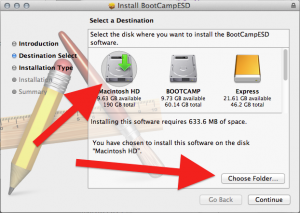
Still in Mac OS X, once your pkg is downloaded, double click it and install to a folder on your hard drive so you know where to find it. During the Installation, click the "Change Location" option so that you can choose where it gets installed.

- The folder contains a nest of folders, the last of which contains a dmg disk image file. Double click that to open. At last! Here are your Windows installer files.


- Copy them to a usb drive, or a burnable CD. NB, it’s still 660MB or more, so it’s a full CDs worth of burning time.
- Done. You can now proceed with Boot Camp assistant Windows installation and boot the Mac in Windows.
If you must do the download in Windows instead OS X, it's harder. You will need the help on http://www.cafe-encounter.net/p860/opening-a-bootcamp-driver-download-on-windows-7-or-8-with-7-zip to open the pkg file and the dmg file inside it.
BootCamp Direct Download Links
Most of these driver downloads work for both Windows 7 and Windows 8. Windows 8 on 32-bit is not officially supported, but almost everything seems to works on fine on not-officially supported models: the only specific shortcoming I'm aware of is that the screen brightness buttons don't work on all models.
| Model Identifier | Size & driver release date | Direct Download Link |
|---|---|---|
|
Macmini6,1 Macmini6,2 MacBookPro10,2 iMac13,1 iMac13,2 |
438MB, 3 Dec 2012 | http://swcdn.apple.com/content/downloads/54/18/041-8805/9tglhtxadqtnrro79rsdy4f0mkgu7wg6or/BootCampESD.pkg |
|
MacBookPro9,1 MacBookPro9,2 |
1,058MB, 15 June 2012 | http://swcdn.apple.com/content/downloads/11/05/041-0925/g27es04pw9re5ggrfp3vuf8ew6r53asfz8/BootCampESD.pkg |
|
MacBookPro10,1 MacBookAir5,1 MacBookAir5,2 |
942MB, 15 June 2012 | hhttp://swcdn.apple.com/content/downloads/55/51/041-3891/se4uhpqng48t842cdsosqh28lft54fmswl/BootCampESD.pkg |
|
MacBookAir4,1 MacBookAir4,2 Macmini5,1 Macmini5,2 Macmini5,3 |
676MB, 23 May 2012 | hhttp://swcdn.apple.com/content/downloads/32/33/041-2303/W5jKtsQhhMgMXs3TKhPDqLXrpXyY2HdXMN/BootCampESD.pkg |
|
MacBook2,1 MacBook3,1 MacBook4,1 MacBook5,1 MacBook5,2 MacBook5,3 MacBook6,1 MacBook7,1 MacBookAir1,1 MacBookAir2,1 MacBookAir3,1 MacBookAir3,2 MacBookPro2,1 MacBookPro2,2 MacBookPro3,1 MacBookPro4,1 MacBookPro5,1 MacBookPro5,2 MacBookPro5,3 MacBookPro5,4 MacBookPro5,5 MacBookPro6,1 MacBookPro6,2 MacBookPro7,1 MacBookPro8,1 MacBookPro8,2 MacBookPro8,3 MacPro1,1 MacPro2,1 MacPro3,1 MacPro4,1 MacPro5,1 Macmini2,1 Macmini3,1 Macmini4,1 iMac5,1 iMac6,1 iMac7,1 iMac8,1 iMac9,1 iMac10,1 iMac11,1 iMac11,2 iMac11,3 iMac12,1 iMac12,2 |
632MB, 23 May 2012 | http://swcdn.apple.com/content/downloads/33/54/041-2011/pRtCDYcWShMLxFggy3TzFzmfnnWQNFQBfJ/BootCampESD.pkg |
Finding your ModelIdentifier
If you're struggling to find your ModelIdentifier then you want the brilliant page at everymac.com which can tell you what model Mac you have based on serial number. On the result page after you submit, look carefully and you'll the ModelIdentifier.
Still stuck?
If you're still stuck, then:
- Look through the comments for people with similar problems -- there have been a couple of hundred so they cover pretty much everything I can suggest.
- Try my summary of problems/solutions for direct download of bootcamp drivers
References
See BootCampESD.pkg download instructions for references and for the DIY instructions to work out these links yourself.

